Proxmox Part 3 - TPM 2.0 & Root LUKS
Initialize the TPM 2.0 module and implement automatic LUKS decryption during boot
Motivation
This is Part 3 of my project to build a secure Proxmox VE installation. In the previous article, I configured Proxmox to use Secure Boot with signed unified kernel images.
In this post, the goal is to initialize the TPM 2.0 module on the Terramaster F4-424 Pro and use it to automatically unlock the encrypted root filesystem at boot.
A Quick Introduction to Trusted Platform Module (TPM)
A TPM is a hardware-based security processor designed to provide security functions. Its core purpose is to protect sensitive data like encryption keys from software-based attacks.
The Terramaster F4-424 Pro has an Intel based firmware TPM (fTPM), commonly known as Intel Platform Trust Technology (PTT). This means the TPM’s functions run in a special, isolated environment on the main CPU (Intel i3-N305) called a Trusted Execution Environment (TEE).
The TPM has three primary functions
Secure Cryptographic Operations It can generate, store, and manage cryptographic keys in a secure, hardware-bound manner.
Platform Integrity & Attestation: The TPM can “measure” the software and firmware components as the system boots — from the BIOS to the operating system. These measurements are stored in special registers (PCRs) and are used to verify that the system hasn’t been tampered with.
Secure Storage: It provides a protected area for sensitive data like encryption keys and passwords. Access to this data can be restricted by defining policies. For example, a policy can state, “Only release the disk encryption key if the boot process measurements (PCRs) are exactly what they should be”
Understanding TPM Hierarchies
The TPM separates its functions and keys into four distinct areas, known as hierarchies. Three are persistent, and one is for temporary use.
Platform Hierarchy (PH)
This hierarchy is usually managed by the platform manufacturer (Terramaster). It’s used for platform-specific security functions, such as verifying firmware updates and managing the secure boot process. The Platform Hierarchy can also be used to manage the TPM’s brute-force protection, a function that also has its own dedicated access control called lockoutAuth. In tpm2-tools, this authorization is referenced as lockout.
Storage Hierarchy (SH)
This is the main hierarchy for the system owner and the operating system. It’s designed for general-purpose key and data protection. For example this hierarchy would be used for storing the key needed to unlock an encrypted partition. This platform is authenticated through ownerAuth which in TPM2-Tools is referenced as owner.
Endorsement Hierarchy (EH)
This hierarchy proves the TPM’s authenticity. It contains a unique Endorsement Key (EK), which is uniquely and permanently assiociated with the TPM by its manufacturer (Intel). The EK acts like a digital birth certificate, allowing the TPM to prove to other systems that it is a genuine and trustworthy device. This is used for advanced security features like Remote Attestation, where a remote system can verify if the machine is in a trusted state. This platform is authenticated through endorsementAuthwhich in TPM2-Tools is referenced as endorsement.
Null Hierarchy
This is a temporary workspace. Any keys or data created in the Null Hierarchy are automatically wiped clean when the system reboots. It’s used for ephemeral keys and other short-lived cryptographic operations.
PCRs and Measured Boot
A Platform Configuration Register (PCR) is a unique memory location inside the TPM used to securely record the state of the system’s state as it boots. The recording process is called a measured boot.
On a typical PC there are 24 PCRs (0-23). You can’t write directly to these registers; instead, their values are updated through a special cryptographic process called extending. When a component is about to be loaded (like the BIOS or bootloader), its hash is calculated. This new measurement is then combined with the current value of a specific PCR to produce a new value.
The formula is: New_PCR_Value = HASH(Current_PCR_Value ∥ New_Measurement)
The ∥ symbol represents concatenation. This works as one-way hash chains; you can’t reverse it to remove a measurement. The final PCR value is a unique fingerprint of every single piece of software that has been loaded in that specific order. Even the slightest modification to a boot component would result in a completely different final PCR value, making tampering easy to detect.
PCR Definitions in Linux
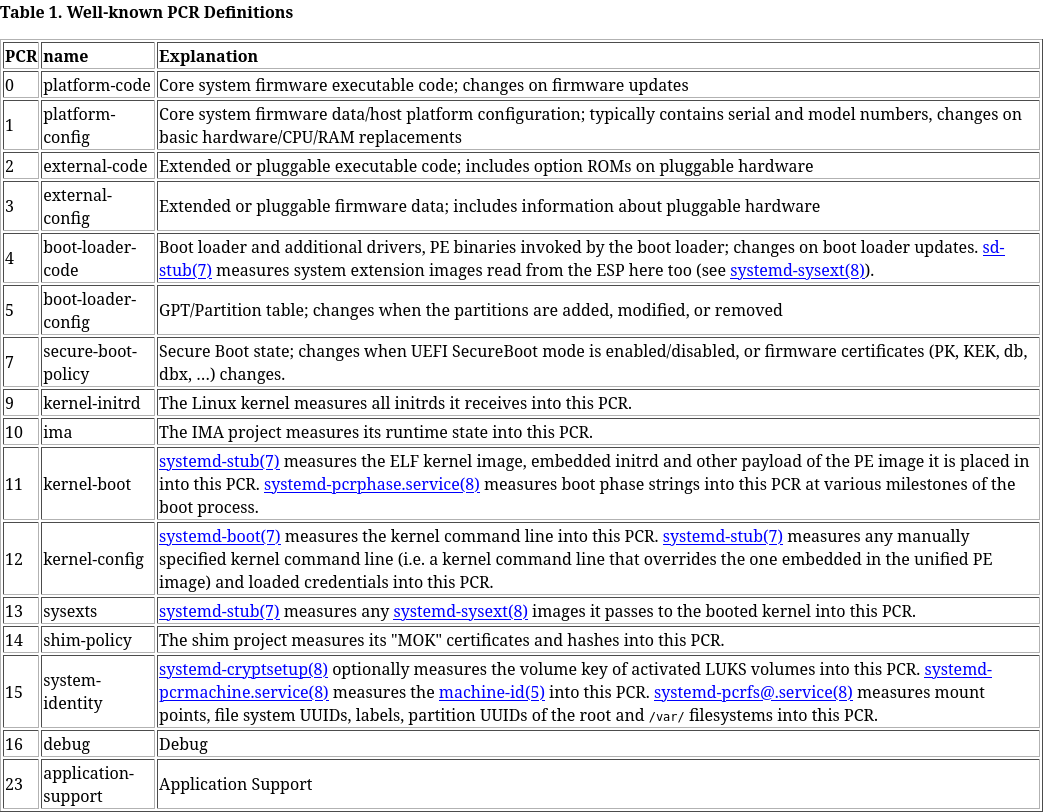 Table sourced from systemd-cryptenroll man page
Choosing PCRs to unlock LUKS
Background
Although SHA384 is cryptographically stronger than SHA256, I decided to enable only the SHA256 PCR banks. The main reason is better compatibility with older TPM2-tools and the version of systemd (v252) included with Debian 12.
Since systemd v252 was released in 2023, TPM support has evolved significantly. More recent versions, available in bookworm-backports (v254) or future releases like Debian 13 (v257), offer more streamlined and improved tools (systemd-ukify). However, my goal is to keep this Proxmox installation as close to the official release as possible to avoid stability and future upgrade issues.
PCRs for this Project
I’ve chosen to bind the LUKS key to PCR banks 0, 7 and 16. This provides a good balance between security and maintenance. It protects against malicious firmware or Secure Boot changes without requiring to re-seal the key after every kernel update. However, once the project is ready, I will revisit this decision.
Bank 0 (UEFI Firmware)
This PCR’s value represents the firmware itself. If an attacker (or an official update) modifies the firmware, the hash will change and the TPM will refuse to release the key. While this means I’ll need to manually re-seal the key after a firmware update from Terramaster, I accept this maintenance burden for the security it provides.
Bank 7 (Secure Boot Policy)
This is a standard choice. This PCR tracks the state of Secure Boot and its keys. If Secure Boot is disabled or its keys are modified, the hash changes and the TPM will not unseal the LUKS key.
Bank 16 (Debug / Software)
This PCR’s value will be zero during boot, once the TPM has released the LUKS key this PCR should be extended with random value. This works as a “used” flag to ensure the LUKS key cannot be unsealed more than once.
Choosing an Unlocking Strategy
Most online tutorials use systemd-cryptenroll or clevis. However, the systemd-cryptenroll version in Debian 12 (including Clevis) does not support enrolling a LUKS key if the TPM’s Owner hierarchy is password-protected. A workaround exists, but I prefer avoiding such approach until I get a chance to upgrade to Trixie and test a more recent tools.
Therefore, the strategy will be to create a simple unlocking mechanism using custom scripts in the initramfs.
Initramfs Hook
Adds the tpm2_unseal, tpm2_pcrextend and tpm2_getrandom tools to the initramfs image (initrd) so that they are available in early boot environment.
Cryptsetup Script
This script runs tpm2_unseal to fetch the LUKS key from the TPM.
Crypttab
This configuration file tells cryptsetup to execute the cryptsetup script to get the LUKS key and unlock the partition.
Initramfs Script
This script is executed once rootfs has been mounted. It uses tpm2_pcrextend to extend the PCR 16 value with a random value generated using tpm2_getrandom.
TPM 2.0 Configuration
Module Configuration in UEFI
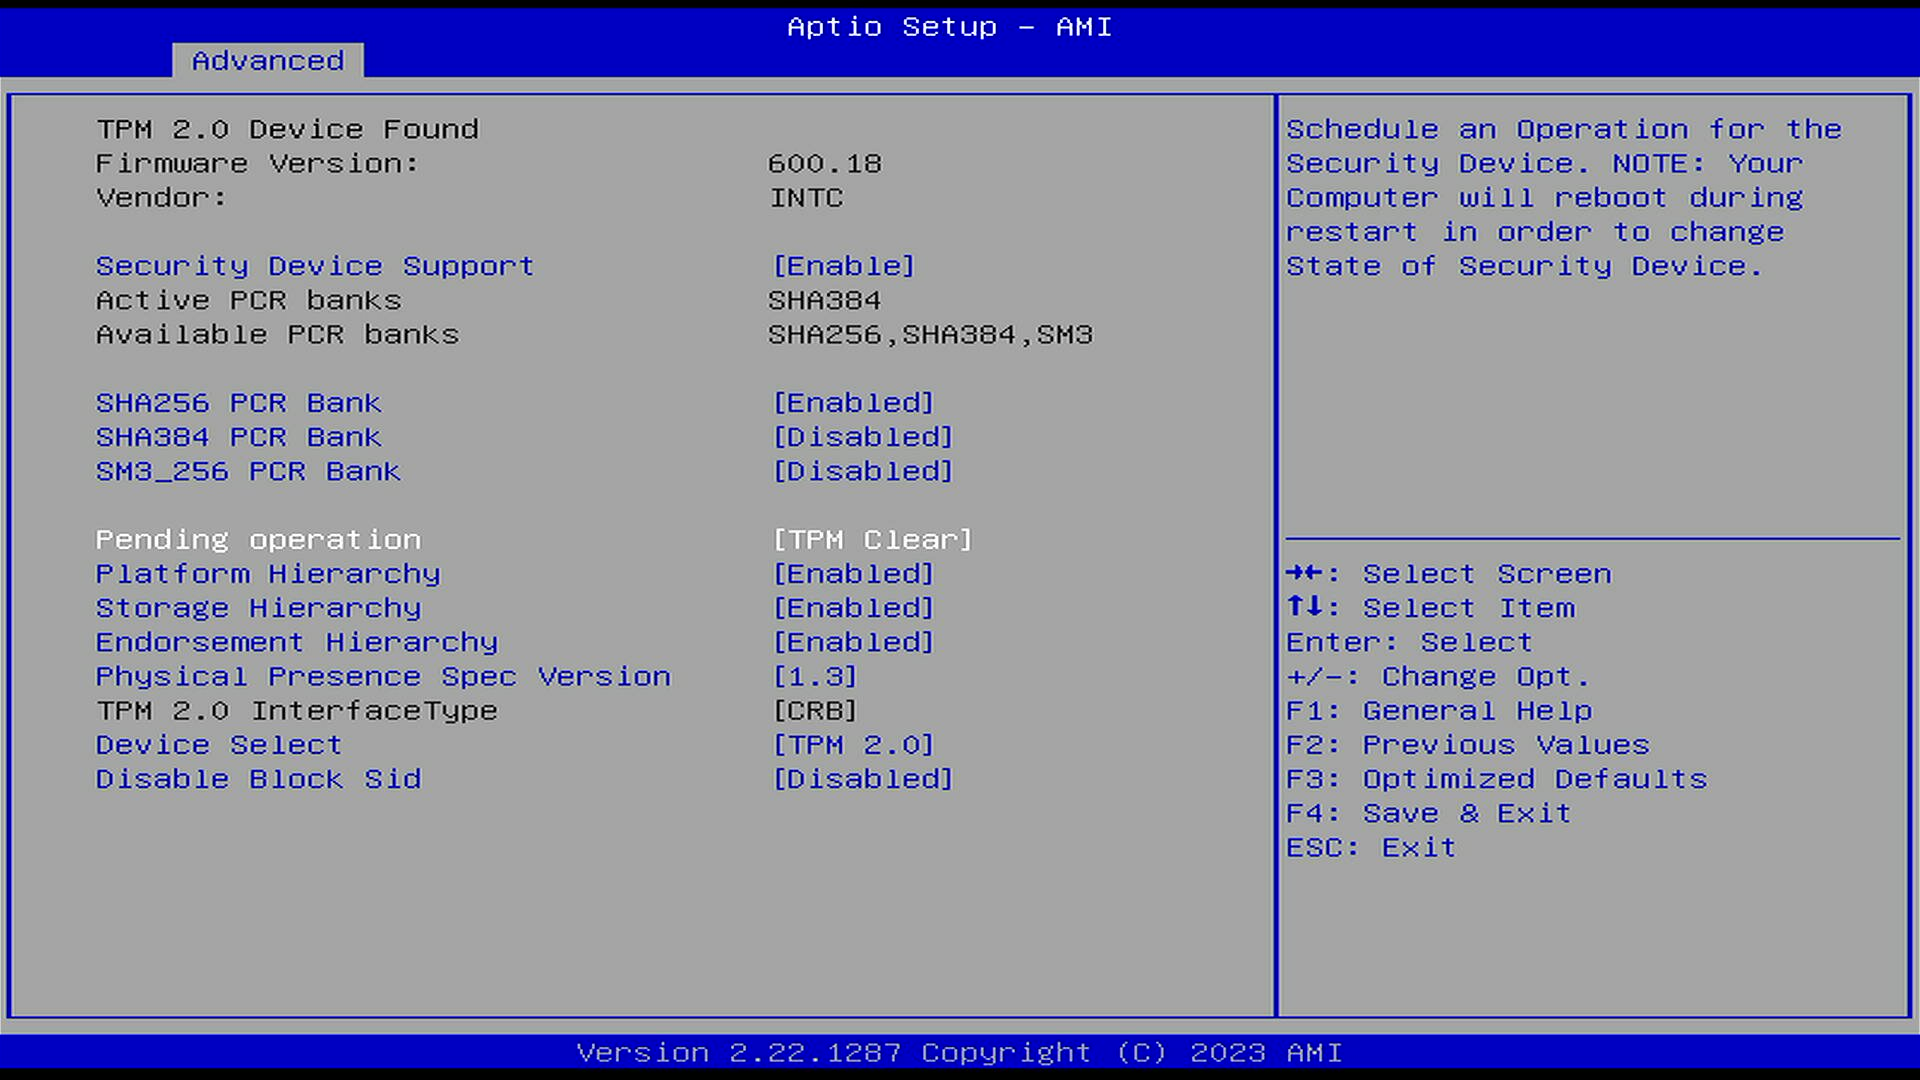
In UEFI, navigate to Advanced -> Trusted Computing
Set following configuration:
- SHA256 PCR Bank: Enabled
- SHA384 PCR Bank: Disabled
- SM3_256 PCR Bank: Disabled
- Pending Operation: TPM Clear <– this will change back to None after the reboot
- Platform Hierarchy: Enabled
- Storage Hierarchy: Enabled
- Endorsement Hierarchy: Enabled
- Physical Presence Spec Version: 1.3
- Device Select: TPM 2.0
- Device Block Sid: Disabled
Password Protect UEFI
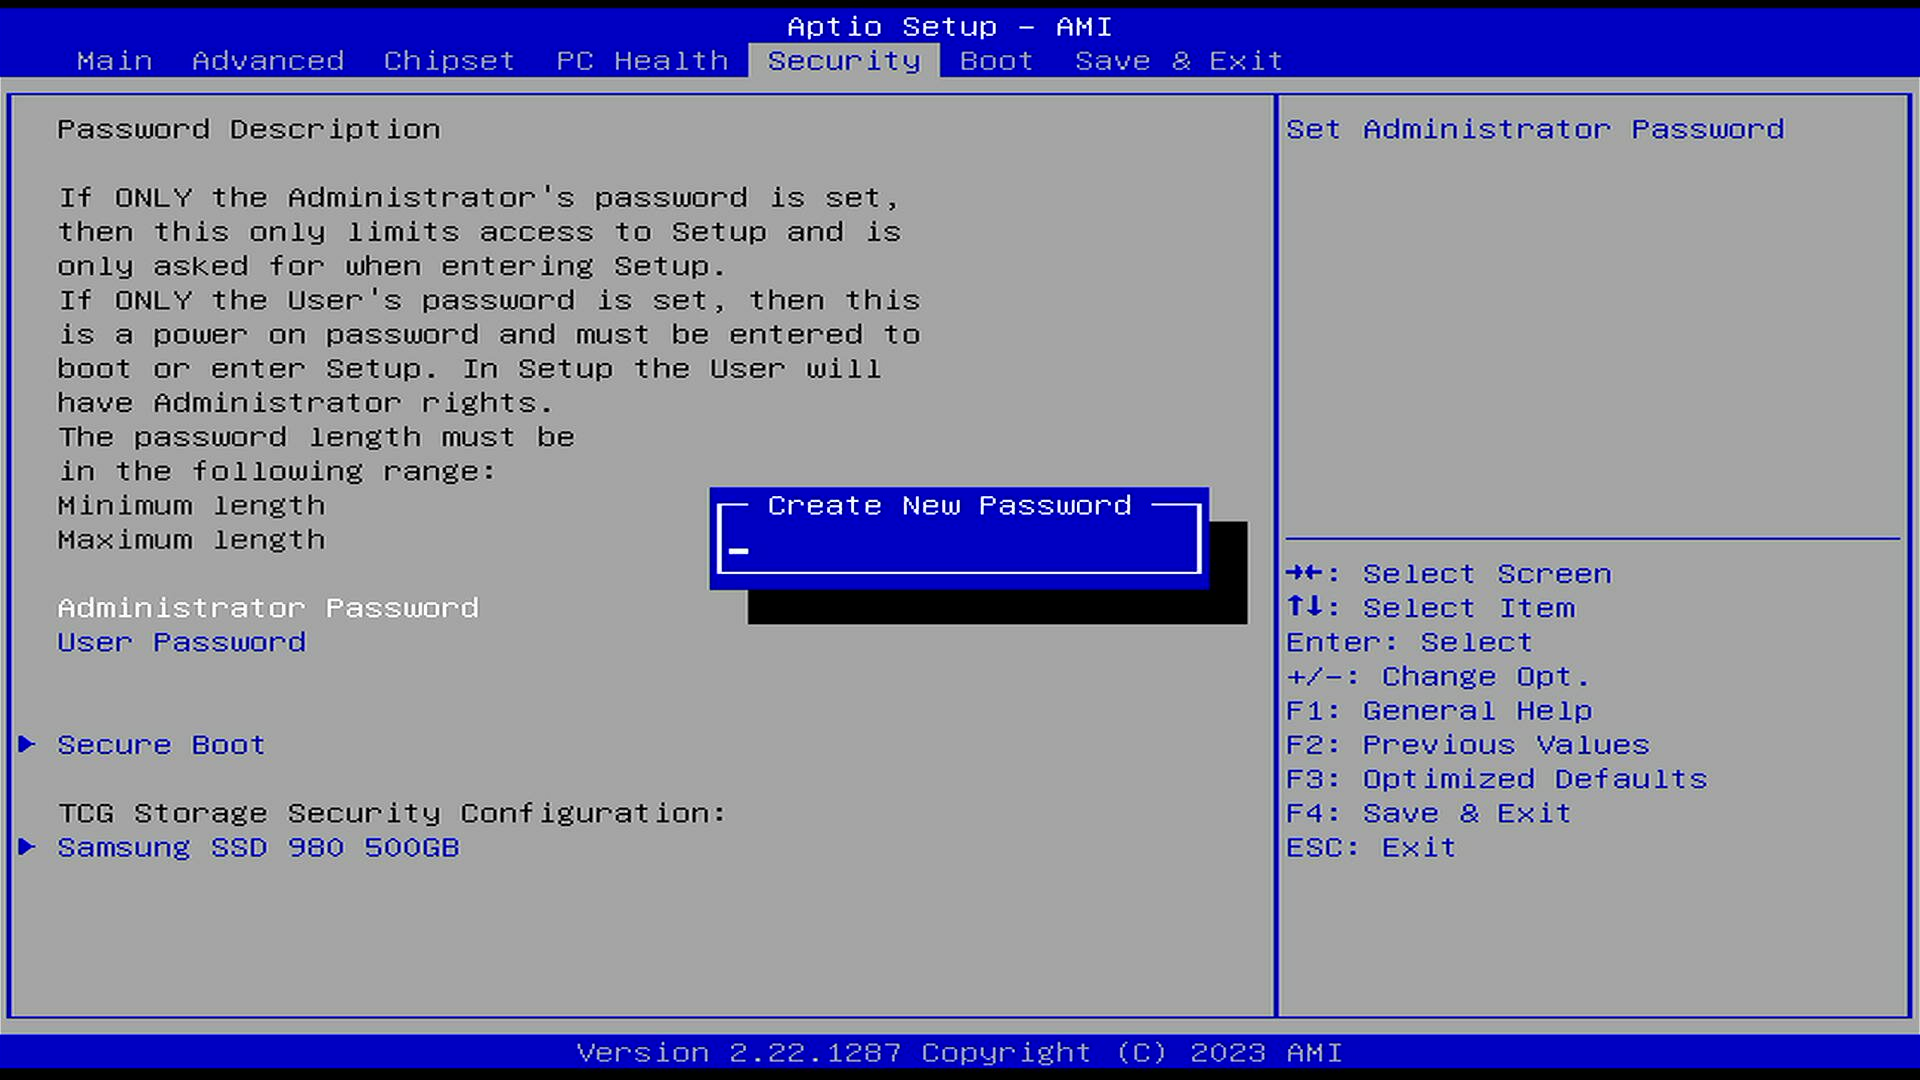
While in UEFI, it’s a good idea to set an Administrator password to lock the access to UEFI.
Install Dependencies and Clone the repo
First, install the TPM2-tools package to interact with the module
1
apt install tpm2-tools
If not done already, clone the project repository into encrypted workspace. The files for this article are in the part3 folder.
1
git clone https://github.com/tanezky/proxmox-project.git
Verify TPM Endorsement Key (EK)
Before initializing and storing secrets in the TPM, it’s a good practice to verify its authenticity. This can be done by checking the Endorsement Key (EK) certificate chain. This process proves that the TPM is a genuine hardware module provisioned by Intel.
Inspect existing keys
We’ll start with reading what certificates are present on TPM
1
2
3
4
5
6
7
8
9
10
11
12
# Read public handles (indices)
tpm2_nvreadpublic

# response
0x1c00002:
  ...
0x1c0000a:
  ...
0x1c00016:
  ...
0x1c00100:
  ...
The precense of 0x1c00002 and 0x1c0000a indicates that handles lies in Low Range (0x01C00002 - 0x01C0000C), this means that Intel has provisioned certificates using standard handle values.
These handles are defined in TCG EK Credential Profile as:
- 0x1c00002: RSA 2048 EK Certificate
- 0x1c0000a: ECC NIST P256 EK Certificate
- 0x1c00016: ECC NIST P384 EK Certificate (H-3)
- 0x1c00100: EK Certificate Chain Index 1
This gives us a starting point on collecting certificates for building the whole chain for verification.
Verify the Certificate Chain
Next we’ll read the RSA EK Certificate (0x1c00002) and the intermediate EK Certificate (0x1c00100) from the TPM and follow the chain of trust up to its root certificate by downloading each issuing CA’s certificate.
1
2
3
4
5
6
7
8
9
10
11
12
13
14
15
16
17
18
19
20
21
22
23
24
25
26
27
28
29
30
31
32
33
34
35
36
37
38
39
# 1. Save the RSA EK Certificate from TPM
tpm2_nvread 0x01c00002 > rsa_ek.cer

# 2. Save the intermediate "EK Certificate Chain Index 1" from TPM
tpm2_nvread 0x1c00100 > ek_chain.cer

# Current chain: rsa_ek.cer -> ek_chain.cer

# 3. Find the URL for the next certificate
openssl x509 -in ek_chain.cer -noout -text | grep "CA Issuers"
# CA Issuers - URI:https://tsci.intel.com/content/OnDieCA/certs/ADL_00002701_ODCA_CA2.cer

# 4. Download it
wget -O intel_odca_ca2.cer https://tsci.intel.com/content/OnDieCA/certs/ADL_00002701_ODCA_CA2.cer

# Current chain: rsa_ek.cer -> ek_chain.cer -> intel_odca_ca2.cer

# 5. Repeat for the next certificate in the chain
openssl x509 -in intel_odca_ca2.cer -noout -text | grep "CA Issuers"
# CA Issuers - URI:https://tsci.intel.com/content/OnDieCA/certs/ODCA_CA2_CSME_Intermediate.cer

# 6. Download it
wget -O intel_odca_intermediate.cer https://tsci.intel.com/content/OnDieCA/certs/ODCA_CA2_CSME_Intermediate.cer

# Current chain: rsa_ek.cer -> ek_chain.cer -> intel_odca_ca2.cer -> intel_odca_intermediate.cer

# 7. Repeat for the next certificate in the chain
openssl x509 -in intel_odca_intermediate.cer -noout -text | grep "CA Issuers"
# CA Issuers - URI:https://tsci.intel.com/content/OnDieCA/certs/OnDie_CA_RootCA_Certificate.cer

# 8. Download it
wget -O intel_rootca.cer https://tsci.intel.com/content/OnDieCA/certs/OnDie_CA_RootCA_Certificate.cer

# Current chain: rsa_ek.cer -> ek_chain.cer -> intel_odca_ca2.cer -> intel_odca_intermediate.cer -> intel_rootca.cer

# 9. Check if more urls is found
openssl x509 -in intel_rootca.cer -noout -text | grep "CA Issuers"

# No more URLs, all certificates found.
With all certificates downloaded, we can now verify the entire chain using OpenSSL.
1
2
3
4
5
6
7
8
9
10
11
12
13
14
15
16
17
openssl verify -show_chain \
-trusted intel_rootca.cer \
-untrusted intel_odca_intermediate.cer \
-untrusted intel_odca_ca2.cer \
-untrusted ek_chain.cer \
rsa_ek.cer

# response
rsa_ek.cer: OK
Chain:
depth=0:  (untrusted)
depth=1: CN = CSME ADL PTT  01SVN (untrusted)
depth=2: CN = CSME ADL SVN01 Kernel CA (untrusted)
depth=3: CN = CSME ADL ROM CA (untrusted)
depth=4: OU = ODCA 2 CSME P_ADL 00002701 Issuing CA, CN = www.intel.com (untrusted)
depth=5: OU = ODCA CA2 CSME Intermediate CA, CN = www.intel.com (untrusted)
depth=6: C = US, ST = CA, L = Santa Clara, O = Intel Corporation, OU = OnDie CA Root Cert Signing, CN = www.intel.com
The rsa_ek.cer: OK status confirms that our TPM’s Endorsement Key certificate is valid and chains back to a trusted Intel Root CA. This gives us high confidence that the TPM is authentic.
Initialize the TPM
Check the TPM state
Verify the TPM is in a clean, un-provisioned state.
1
2
3
4
5
6
7
8
9
10
11
12
13
14
15
16
17
18
19
20
21
22
23
24
25
26
27
28
29
30
31
32
33
34
35
36
37
38
tpm2_getcap properties-variable

# response
TPM2_PT_PERMANENT:
  ownerAuthSet:              0 # <- Not set
  endorsementAuthSet:        0 # <- Not set
  lockoutAuthSet:            0 # <- Not set
  reserved1:                 0
  disableClear:              0 # <- Module can be cleared to default state
  inLockout:                 0 # <- Not in lockout state
  tpmGeneratedEPS:           0 # <- Endorsement Primary Seed (EPS) not generated
  reserved2:                 0
TPM2_PT_STARTUP_CLEAR:
  phEnable:                  1 # <- Platform hierarchy enabled
  shEnable:                  1 # <- Storage hierarchy enabled
  ehEnable:                  1 # <- Endorsement hierarchy enabled
  phEnableNV:                1 # <- NV indices are accessible
  reserved1:                 0
  orderly:                   0
TPM2_PT_HR_NV_INDEX: 0x0
TPM2_PT_HR_LOADED: 0x0 # <- should be 0x0
TPM2_PT_HR_LOADED_AVAIL: 0x3
TPM2_PT_HR_ACTIVE: 0x0 # <- should be 0x0
TPM2_PT_HR_ACTIVE_AVAIL: 0x40 # <- TPM has 64 slots for active sessions
TPM2_PT_HR_TRANSIENT_AVAIL: 0x3
TPM2_PT_HR_PERSISTENT: 0x0 # <- should be 0x0
TPM2_PT_HR_PERSISTENT_AVAIL: 0x15 # <- TPM has 21 slots for persistent keys
TPM2_PT_NV_COUNTERS: 0x0
TPM2_PT_NV_COUNTERS_AVAIL: 0x4
TPM2_PT_ALGORITHM_SET: 0x0
TPM2_PT_LOADED_CURVES: 0x4
TPM2_PT_LOCKOUT_COUNTER: 0x0 # <- should be 0x0
TPM2_PT_MAX_AUTH_FAIL: 0x20 # <- Max. 32 password attempts
TPM2_PT_LOCKOUT_INTERVAL: 0x1C20 # <- 7200 seconds (2hrs)
TPM2_PT_LOCKOUT_RECOVERY: 0x15180 # <- 86400 seconds (24hrs)
TPM2_PT_NV_WRITE_RECOVERY: 0x0
TPM2_PT_AUDIT_COUNTER_0: 0x0
TPM2_PT_AUDIT_COUNTER_1: 0x0
In case the output shows other values than 0 or 0x0, clear the TPM2 with tpm2_clear before proceeding.
In case the command doesn’t work and there’s no way to clear TPM in UEFI, running this command stages TPM reset and after reboot the TPM should be cleared. echo 5 > /sys/class/tpm/tpm0/ppi/request
Take ownership of the TPM
Set passwords for the owner, endorsement and lockout hierarchies. From now on it is recommended to use complex, long passwords (minimum 16 characters). Preferably generated and stored in a password manager.
1
2
3
tpm2_changeauth -c owner "YOUR_STRONG_OWNER_PASSWORD"
tpm2_changeauth -c endorsement "YOUR_STRONG_ENDORSEMENT_PASSWORD"
tpm2_changeauth -c lockout "YOUR_STRONG_LOCKOUT_PASSWORD"
Then verify these were set
1
2
3
4
5
6
7
8
tpm2_getcap properties-variable

# response
TPM2_PT_PERMANENT:
  ownerAuthSet:              1
  endorsementAuthSet:        1
  lockoutAuthSet:            1
  ...
Create Storage Root Key (SRK)
Lastly, create a persistent parent key for storage hierarchy.
1
2
3
4
5
6
7
8
9
10
11
12
13
14
# Create the key
tpm2_createprimary -C o -g sha256 -G rsa -c primary.ctx -P "YOUR_STRONG_OWNER_PASSWORD"

# Make the SRK persistent at handle 0x81000001
tpm2_evictcontrol -C o -c primary.ctx 0x81000001 -P "YOUR_STRONG_OWNER_PASSWORD"

# Destroy the context file
shred -u primary.ctx

# Verify it is persistent
tpm2_getcap handles-persistent

# response
- 0x81000001
Commands
- tpm2_createprimary ← Create a primary object
-C oSpecifies hierarchy under Owner-g sha256Sets name-generating algotrithm-G rsaDefines key type to RSA key (defaults to 2048 bits)-c primary.ctxSpecifies context file, contains public and sensitive portions-P "YOUR_STRONG_OWNER_PASSWORD"Authorization password for the owner hierarchy
- tpm2_evictcontrol ← Control object persistence
-C oSpecifies hierarchy under Owner-c primary.ctxContext file, the object to be made persistent0x81000001Handle, location in TPM non-volatile memory. This handle is commonly used and is listed as reserved for SRK in TPM2 Provisioning Guidance-P "YOUR_STRONG_OWNER_PASSWORDAuthorization password for the owner hierarchy
The TPM is now initialized and ready to use.
LUKS
Part 1: Generate and Add the LUKS key
1
2
3
4
5
# Generate a 48-byte raw binary keyfile using the TPM's hardware random number generator (384-bit entropy)
tpm2_getrandom 48 --output luks.key

# Add this new key to LUKS partition (it will prompt for current LUKS password)
cryptsetup luksAddKey /dev/nvme0n1p2 luks.key
Part 2: Create the PCR Policy
1
2
3
4
5
6
7
8
# Start a policy session
tpm2_startauthsession -S session.dat --policy-session

# Define a policy based on PCRs 0, 7 and 16 and save it to a pcr.policy file
tpm2_policypcr -S session.dat -L pcr.policy -l sha256:0,7,16

# Close the policy session
tpm2_flushcontext session.dat
Part 3: Seal the key into the TPM
1
2
3
4
5
6
7
8
9
10
11
# Create the sealed object, protected by the SRK and bound by PCR policy
tpm2_create -C 0x81000001 -L pcr.policy -u key.pub -r key.priv -i luks.key

# Load the sealed object into the TPM to get its context
tpm2_load -C 0x81000001 -u key.pub -r key.priv -n key.name -c key.ctx

# Make the sealed object persistent at handle 0x81000002
tpm2_evictcontrol -C o -c key.ctx 0x81000002 -P "YOUR_STRONG_OWNER_PASSWORD"

# Securely delete all temporary files
shred -u key.ctx key.name key.priv key.pub luks.key pcr.policy session.dat
Part 4: Configure Initramfs to unlock LUKS
Option 1: Use shell script to copy files
There’s a shell script available in Part3 folder to copy initramfs files into place.
1
bash init_tpm_initramfs.sh
What it does
- Copy Initramfs hook into
/etc/initramfs-tools/hooks/ - Copy tpm_pcrextend script into
/etc/initramfs-tools/scripts/local-bottom/- Scripts inside the local-bottom folder are run after the rootfs has been mounted.
- Copy Cryptsetup script into
/lib/cryptsetup/scripts/
Option 2: Manually copy files to system locations
1
2
3
4
5
6
7
8
9
10
11
# Initramfs hook
install -o root -g root -m 744 \
  tpm_tools_hook.sh /etc/initramfs-tools/hooks/tpm_tools_hook.sh

# PCR extend script
install -o root -g root -m 744 \
  tpm_pcrextend.sh /etc/initramfs-tools/scripts/local-bottom/tpm_pcrextend.sh

# Cryptsetup script
install -o root -g root -m 744 \
  tpm_unseal.sh /lib/cryptsetup/scripts/tpm_unseal.sh
Edit crypttab configuration
1
2
3
4
5
# Edit crypttab
nano /etc/crypttab

# Add ",keyscript=/lib/cryptsetup/scripts/tpm_unseal.sh" to the end of the line. For example:
nvme0n1p2_crypt UUID=... none luks,discard,keyscript=/lib/cryptsetup/scripts/tpm_unseal.sh
Part 5: Update Initramfs and Recreate the UKI
1
2
3
4
5
6
# Regenerate the entire initramfs
update-initramfs -d -c -k $(uname -r)

# Generate the new UKI (the script is located in part2/uki)
# It will prompt a password for the Secure Boot db.key
bash uki_create.sh
Part 6: Reboot and Troubleshoot
Reboot the device. It should now boot directly to the Proxmox login screen without prompting for a LUKS password.
Note on Demo video The boot process takes around 50 seconds.
Troubleshooting
In case automatic unlocking was not successful, these commands might be helpful for debugging
1
2
3
4
5
6
7
8
9
10
11
12
13
14
15
16
17
18
19
20
21
22
23
24
25
26
#
# If the boot fails and drops to busybox
# 1. Mount partition manually (latter, _crypt part usually follows standard naming based on partition name)
cryptsetup luksOpen /dev/nvme0n1p2 nvme0n1p2_crypt
# 2. Continue with boot
exit

#
# Inspect the initrd
# 1. Check if the executables and scripts were copied
lsinitramfs /boot/initrd.img-$(uname -r) | grep tpm

# response
scripts/local-bottom/tpm_pcrextend.sh
usr/bin/tpm2
usr/bin/tpm2_getrandom
usr/bin/tpm2_pcrextend
usr/bin/tpm2_unseal
usr/lib/cryptsetup/scripts/tpm_unseal.sh

# 2. Check if the TCTI library was copied
lsinitramfs /boot/initrd.img-$(uname -r) | grep libtss2-tcti-device

# response
usr/lib/x86_64-linux-gnu/libtss2-tcti-device.so.0
usr/lib/x86_64-linux-gnu/libtss2-tcti-device.so.0.0.0
Part 7: Finalisation
Once the system boots succesfully without prompting LUKS password, it’s good practice to change the LUKS password to a strong one since it’s no longer needed for boots.
1
2
# Change password in slot 0
cryptsetup luksChangeKey /dev/nvme0n1p2 -S 0
Done.
Other Commands
Some useful commands for managing TPM and LUKS keys.
1
2
3
4
5
6
7
8
# Reset TPM to unprovisioned state
tpm2_clear "YOUR_STRONG_LOCKOUT_PASSWORD"

# Reset Dictionary Lockout
tpm2_dictionarylockout --clear-lockout -p "YOUR_STRONG_LOCKOUT_PASSWORD"

# Inspect PCRs
tpm2_pcrread
Resealing
Sooner or later resealing is required, for example UEFI firmware was updated or modifying Secure Boot keys.
Currently resealing involves manual steps, however, this shouldn’t happen too often.
1
2
3
4
5
6
7
8
9
10
11
12
13
14
15
16
17
18
19
20
21
22
23
24
25
26
27
28
29
30
31
32
33
34
35
36
37
38
39
40
41
42
43
44
45
46
# 1. Evict persistent handle for LUKS key
tpm2_evictcontrol -C o -c 0x81000002 -P "YOUR_STRONG_OWNER_PASSWORD"

# 2. Remove key from LUKS slot 1
cryptsetup luksKillSlot /dev/nvme0n1p2 1

# 3. Remove tpm_pcrextend.sh
rm /etc/initramfs-tools/scripts/local-bottom/tpm_pcrextend.sh

# 4. Regenerate initrd
update-initramfs -d -c -k $(uname -r)

# 5. Construct and sign UKI (in location part2/uki)
bash uki_create.sh

# 6. reboot

# 7. Once the boot fails and drops to busybox, mount LUKS rootfs manually
#    and continue with the boot process. The PCR 16 should be back in golden
#    state (all zeros)
cryptsetup luksOpen /dev/nvme0n1p2 nvme0n1p2_crypt
exit

# 8. Create new TPM key and add it to LUKS slot
tpm2_getrandom 48 --output luks.key
cryptsetup luksAddKey /dev/nvme0n1p2 luks.key

# 9. Create the PCR policy
tpm2_startauthsession -S session.dat --policy-session
tpm2_policypcr -S session.dat -L pcr.policy -l sha256:0,7,16
tpm2_flushcontext session.dat

# 10. Seal the key into the TPM
tpm2_create -C 0x81000001 -L pcr.policy -u key.pub -r key.priv -i luks.key
tpm2_load -C 0x81000001 -u key.pub -r key.priv -n key.name -c key.ctx
tpm2_evictcontrol -C o -c key.ctx 0x81000002 -P "YOUR_STRONG_OWNER_PASSWORD"
shred -u key.ctx key.name key.priv key.pub luks.key pcr.policy session.dat

# 11. Restore initrd hooks and scripts (in location part3/)
bash init_tpm_initramfs.sh

# 12. Regenerate initrd
update-initramfs -d -c -k $(uname -r)

# 13. Construct and sign UKI (in location part2/uki)
bash uki_create.sh
After reboot, the system should unlock LUKS automatically and PCR16 is extended with random value.